

How To Disable Windows 10 Update Service
Once the WSUS (Windows Server Update Service) implemented on your company network via Group policy, your Windows 10 or 8.1 computer will be looking Windows updates via this local WSUS server. Though it helps the network administrator to manage the updates and client computers optimally in a larger environment, for end-users it may create some issues. Follow below steps to disable WSUS on Windows 10 computer without changing the Group policy or update server settings.
When a computer is set to get updates from WSUS, it may not be able to receive required or optional Windows updates until the administrator approves them on the server. Also, if you take your computer outside the local/company network, then you can't perform the Windows update. Also, it prevents any Windows features download from the direct Internet because it is set to download from WSUS only.
Disable WSUS on Windows 10 by Registry Modification
This method is simple and easy. As an end-user, you can perform on your computer.
Note: This is just a temporary solution. If you connect back the computer to the company network, the WSUS group policy will be applied automatically and revert the changes. The ideal permanent solution is to move your computer to the different OU where WSUS policy not applied, which can be done by the network/Windows update administrator only. So, as a normal computer user, we have only below option to disable WSUS in Windows 10.
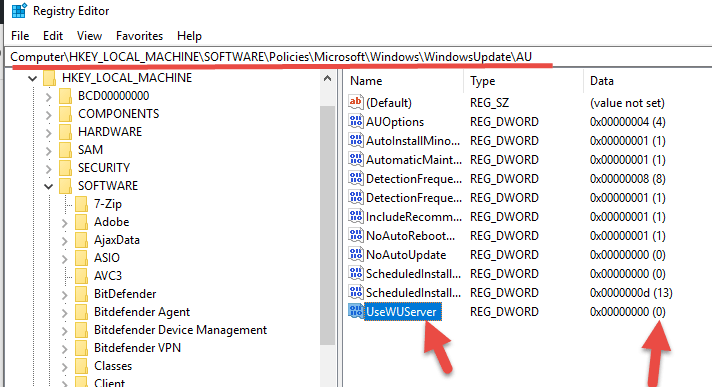
- Open Registry editor (Type regedit in Search)
- Access to the following location: HKLM/Software/Policies/Microsoft/Windows/WindowsUpdate/AU/
- Change the value from 1 to 0 in UseWUServer key. 1 is to use a WSUS server and 0 to disable it.
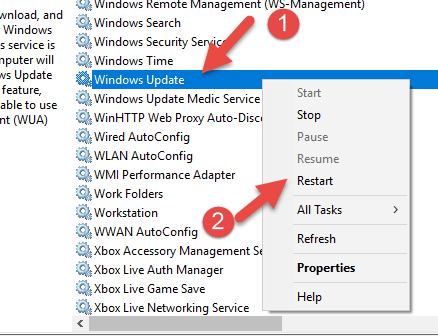
- Once you have changed the above key from 1 to 0, close the registry editor and restart Windows update service. Even if you are okay, restart the computer to take effect.
Here is the place to restart the Windows update service.
Remove WSUS by PowerShell
If you like to use Powershell commands on the local or remote computer to disable WSUS, follow the below steps.
- Search for PowerShell or access it from Start menu and right-click on it to run as administrator .
- Need to stop the Windows update service before executing the actual command. Type Stop-Service -Name wuauserv to stop Windows update service.
- Remove Windows update registry key that is related to WSUS. Type this command: Remove-Item HKLM: \Software\Policies\Microsoft\Windows\WindowsUpdate -Recurse
- Now, let's start the Windows update service again by typing Start-Service -name wuauserv
Now connect the computer to direct Internet and try Windows update or any other component downloads from the Microsoft online update. It should work fine this time.
You may need to check some other guides related to Windows update issues.
Windows 10 Update stuck with 0x80080008 error
Latest Windows Server update issue and solution
If you are still facing some issues in downloading and installing Windows updates on the direct Internet, then possibly the Windows update service/content corrupted on your computer. It is nothing to do with WSUS anymore. You need to look into other directions to solve the issue.

Dinesh is the founder of Sysprobs and written more than 400 articles. Enthusiast in Microsoft and cloud technologies with more than 15 years of IT experience.
How To Disable Windows 10 Update Service
Source: https://www.sysprobs.com/how-to-disable-wsus-on-windows-managed
Posted by: gonzalezwitepheres.blogspot.com
0 Response to "How To Disable Windows 10 Update Service"
Post a Comment